Creating a NestJS application (Part I)
By Joao Paulo Lindgren
Part I
- Add Database Persistence
- Configuration
- Docker and Docker compose
- Add a post subscriber and index content with elastic search
During this pandemic with the free time, I and some friends wanted to do a side project to improve our skills learning new technologies and frameworks. I´ll not focus on what would be this project, but after a few talks we decided to do it, using react native and NodeJs in the backend. It turns out that we did not take this side project out of paper for several reasons, conciliate schedules, different objectives, and lack of agreement as to the direction in which the project should go, among other things. But, during our discussions, one of my friends presented this very promising framework called NestJS as an option to use in the backend. although we stopped our project, I decided to give it a shot to this framework and started a little web application on my own just to learn it.
This article describes in detail the steps I took in creating a “fake” blog API. I start by explaining what NestJS is, how you can set it up, add controllers, persist data, and dockerize it. Be warned that this is just a SAMPLE PROJECT, and while some parts are kept very simple or even lacking, in other aspects you will see some OVERENGINEER because I wanted to discover how things work in NestJS.
What is NestJS
As you can see here, the documentation claims NestJS to be a framework for building efficient, scalable NodeJs applications. It uses progressive JavaScript and combines OOP (Object Oriented Programming), FP (Functional Programming), and FRP (Functional Reactive Programming). Putting the fancy words buzzwords aside, it creates an abstraction on top of express (or fastify) providing an opinionated application architecture. I kind of like opinionated frameworks, even so, you can still customize things, and do it your way, they kind of strongly guide you to use certain tools and code using their style as you can see looking into their documentation. Because of that, create something from scratch is super fast and you can jump in a new project without spending much time thinking how you are going to organize things, “it is not so easy” to break the rules and create messy code using it. A nice thing to have especially for newcomers to the framework. Also, they use typescript which is very positive to me (I confess that I had a bias against, but after using it for some time, I fell in love with it) and seems to have a decent CLI.
Another thing that can be a positive point for some, is that it looks a lot like Angular.js. As Angular is not my background, it was indifferent to me, but probably should be very straightforward for angular developers to jump into NestJS.
Creating the project
Speaking about the project, I decided to create a complex and innovative old but gold sample application! An API for a blog, where we will be able to retrieve, list, create, update, and publish posts! Exciting no!? =]
Jokes apart, I think we can use a lot of tools creating a sample project like this, and to be honest, it was the first idea that came to my mind to create an article.
I am using Windows, Windows Terminal, and Node v14.2.0.
Let’s install the CLI (Command-line interface) package and scaffold a new project.
PS D:\projects> npm i -g @nestjs/cli
PS D:\projects> nest new bloggering
PS D:\projects\bloggering> cd bloggering
We just installed the CLI globally and use it to scaffold our new project with the default arguments (you can use args to change language, package manager, etc). The CLI already create a folder for us with the basic project structure. The entry point of the application is the main.ts where we create our application and define the port it will listen. As you can see, I gave it the name of Bloggering, but you, of course, feel free to give whatever name you want. If you want this is the place where you can set a global prefix for your project. Let’s add for instance a global prefix for our API.
bloggering/src/main.ts
5const app = await NestFactory.create(AppModule);
6app.setGlobalPrefix("api");
Opening the folder in an IDE its structure should look like.
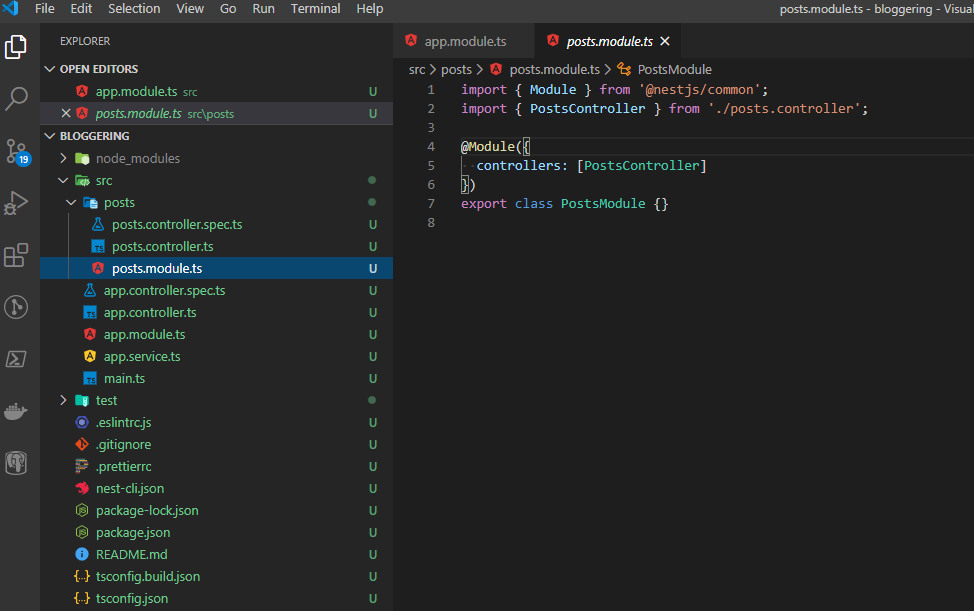
We can run the application now to check it.
PS D:\projects\bloggering> npm run start
You can use fiddler, postman, curl or even the browser and navigate to http://localhost:3000 to see a “hello world* message.
Add controllers
Let’s get into the action and add our fist controller. We´ll create a posts controller that will be responsible to handle all the basic operations over a Post, like create, edit, list, get, etc.
First create a PostsModule where we´ll use to organize everything related to posts into it. Modules are the way NestJS uses to organize your application dependencies keeping each feature segregated and following SOLID principles. Every NestJS has at least one module, the root module. Let’s use the CLI to create one for us using the command generate with the argument module (mo).
Also let’s create a PostsController as well using the command generate controller (co).
PS D:\projects\bloggering> nest generate mo posts
PS D:\projects\bloggering> nest generate co posts
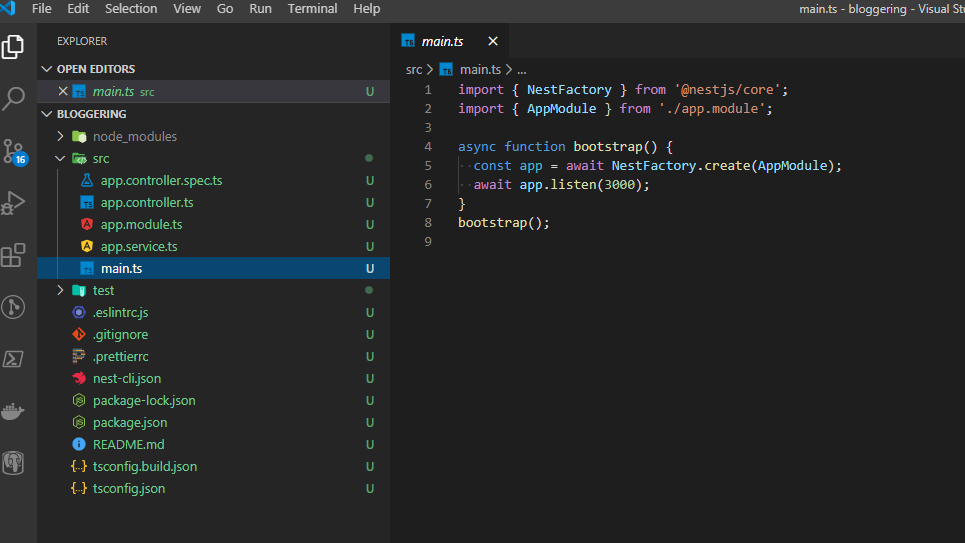 Look that nest created a folder called /posts with a
 posts.controller.ts file and posts.module.ts for us. Besides that, it also updated our app.module.ts to import our new PostsModule.
In the src/posts folder create a file post.entity.ts that will contain our post entity.
After that Inside our new posts.controller.ts we´ll create a couple of endpoints to deal with requests to /posts routes. In the end we should have these two files.
bloggering/src/posts/post.entity.ts
 1export class Post {
 2  constructor(author: string, title: string, content: string) {
 3    this.author = author;
 4    this.title = title;
 5    this.content = content;
 6  }
 7  id: number;
 8  author: string;
 9  title: string;
10  content: string;
11}
bloggering/src/posts/posts.controller.ts
 1import { Controller, Get, Param, Post, HttpCode, Body } from "@nestjs/common";
 2import { Post as BlogPost } from "./post.entity";
 3
 4@Controller("posts")
 5export class PostsController {
 6  @Get()
 7  findAll(): BlogPost[] {
 8    const posts = [new BlogPost("me", "a post", "post content")];
 9    return posts;
10  }
11
12  @Get(":id")
13  find(@Param("id") postId: number): BlogPost {
14    const post = new BlogPost("me", "a post", "post content");
15    post.id = postId;
16    return post;
17  }
18
19  @Post()
20  @HttpCode(204)
21  create(@Body() newPost: BlogPost) {}
22}
Up to now everything is pretty straightforward. Just basic endpoints with some fake data. By the time we are going to create DTOs to avoid expose inner objects to the external world and save/retrieve real posts. For now, the only points worth of notice are:
- I had to import the Post entity as PostEntity. because the name collides with the Post method decorator from NestJS.
- In the find method we defined a route param prefixing with ‘:’ like :id. We can access its value decorating the argument received by the method with “@Param('id'). Of course, the param defined in the route and the decorator has to match.
- In the create method we set the HTTP return status as 204 (no content). And although we did not use it yet, we decorated our argument newPost with the @Body. This means that the content of the body of the HTTP request will be mapped to this field.
Run your application and try to access our news endpoints at the post controller. http://localhost:3000/api/posts. If you don´t know you can use start:dev to run in watch mode. Using this we can run our application and reloads our application automatically every time we modify and save a file.
PS D:\projects\bloggering> npm run start:dev
NestJS show us every route mapped in the build output on the terminal.
 Both Post and Get verbs are already responding
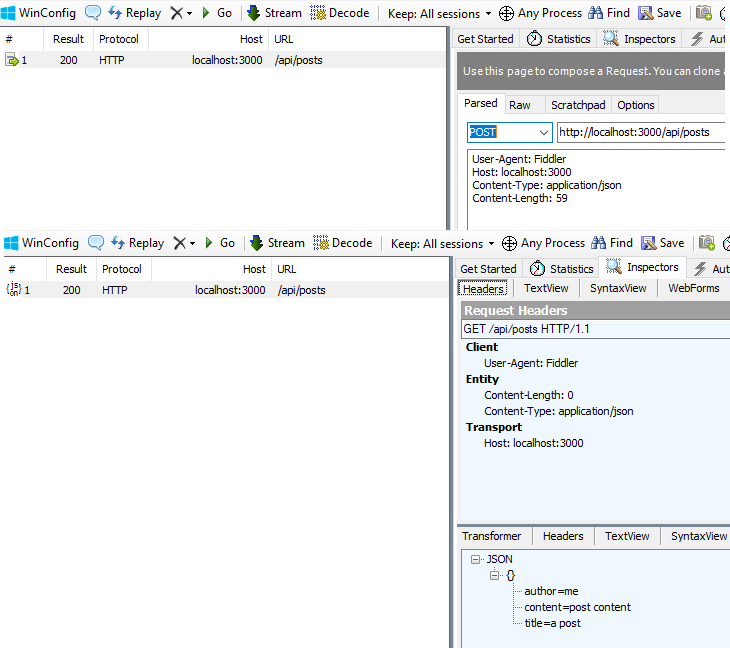 In the next section we are going to create a post service and start to deal with real posts!
Add services
Currently, we have our controllers just creating hardcoded data to return from its endpoints. Now we are going to create a PostsService to save/retrieve dynamically created post entities. Even so, they will not be saved in the database yet, we´ll save them in memory for a while.
After creating this service, we will need to include it as a provider in the PostsModule, this will tell NestJS injector the scope of this dependency and help it control its instantiation and encapsulation to other parts of the system. Then we can inject the service into the PostsController and use it to retrieve and create our posts.
To automatically update the PostsModule dependencies, use the CLI to generate our service. Just like before the command pattern is the same, we just have to change the schematics name to service.
PS D:\projects\bloggering> nest generate service posts
NestJS will automatically create a posts.service.ts file inside the posts folder for us, and update the provider of our PostsModule.
Later we are adding TypeORM to persist our posts in a database, but for now, the application will handle the posts in memory. Lets code our PostsService class.
bloggering/src/posts/posts.service.ts
 1import { Injectable } from "@nestjs/common";
 2import { Post } from "./post.entity";
 3
 4@Injectable()
 5export class PostsService {
 6  private posts: any = {};
 7  private currentId = 1;
 8
 9  createPost(title: string, authorId: string, content: string) {
10    const post = new Post(authorId, title, content);
11    post.id = this.currentId;
12    this.posts[post.id] = post;
13    this.currentId++;
14    return { id: post.id };
15  }
16
17  getPosts = (): Array<Post> => Object.values(this.posts);
18  getSinglePost = (id: number): Post => this.posts[id];
19}
Pretty simple, right? We imported the post entity (by the way, because of the typescript awesomeness, in some IDEs like VSCode if it’s not imported you can simply press ctrl+. and choose the option to import Post entity from module post.entity), then we decorate our class with the @Injectable() marking it as a provider, thus being able to have its life cycle controlled by NestJS and be injected into other objects.
The rest of the class is just pure javascript, we keep our posts in an object called posts indexed by its id, every time we create a new object we increment a variable called currentId that we use to set a post id. To return a list or a single post is just as simple as it could be. Bear in mind that because we are keeping the posts in memory, every time we restart the application we´ll lose its values.
Moving forward, it is time to change our PostsController to have our new service injected and use it to retrieve/create posts instead of just hardcoded data.
bloggering/src/posts/posts.controller.ts
 1import { Controller, Get, Param, Post, HttpCode, Body } from "@nestjs/common";
 2import { Post as BlogPost } from "./post.entity";
 3import { PostsService } from "./posts.service";
 4
 5@Controller("posts")
 6export class PostsController {
 7  constructor(private readonly postsService: PostsService) {}
 8
 9  @Get()
10  findAll(): BlogPost[] {
11    return this.postsService.getPosts();
12  }
13
14  @Get(":id")
15  find(@Param("id") postId: number): BlogPost {
16    return this.postsService.getSinglePost(postId);
17  }
18
19  @Post()
20  @HttpCode(201)
21  create(@Body() newPost: BlogPost) {
22    return this.postsService.createPost(newPost.title, "me", newPost.content);
23  }
24}
We created a constructor to the PostsController receiving our PostsService dependency. Because the PostsService has an @Injectable decorator and we set it as a PostsModule provider, NestJS knows how to resolve this dependency correctly.
The rest of the changes are pretty basic, we just removed the hardcoded data, from the methods and use our service to serve our data. In the create method we removed the HtpStatus(204), otherwise, we would not be able to return the id of the recently created post.
If you want you can remove the PostsService from provider array in the PostsModules to see a dependency resolve error.

If you are using start:dev (watch command), just save the files and the application will restart and reload automatically. Otherwise you will have to start the application again. Let’s test what we have done.
PS D:\projects\bloggering> npm run start:dev
Create a post using the request below: Request
POST http://localhost:3000/api/posts/ HTTP/1.1
Content-Type: application/json
{
    "title": "Working with NestJS",
    "content": "Post content etc...etc...etc..."
}
As a response we should receive our newly created id.
HTTP/1.1 201 Created
X-Powered-By: Express
Content-Type: application/json; charset=utf-8
ETag: W/"8-h5EdGu1QmHe4OkjsU292jNzSLfE"
Date: Sat, 16 May 2020 22:00:26 GMT
Connection: keep-alive
{"id":1}
Now we can use this id, to retrieve this specific post with a GET
GET http://localhost:3000/api/posts/1 HTTP/1.1
As a result the response should be something like that.
HTTP/1.1 200 OK
X-Powered-By: Express
Content-Type: application/json; charset=utf-8
ETag: W/"3e-6fB7zFoU1v8tbDih37C0yfN9O+Y"
Date: Sat, 16 May 2020 22:06:10 GMT
Connection: keep-alive

{"author":"me","title":"Last","content":"dasdasdasdas","id":1}
You can create as many posts as you want, and retrieve all or just a specific one. They will remain until you restart your application.
Until now, our post creation does not have any validation, which means that we are allowing anyone who calls our API to create posts with empty titles or contents. Luckily for us, we can use two libraries called class-validator and class-transformer to add validations to our application. Using a builtIn NestJS pipe called ValidationPipe to make validation as easily as include a decorator into the entity’s property.
PS C:\gems\blog-projects\bloggering> npm install class-validator --save
PS C:\gems\blog-projects\bloggering> npm install class-transformer --save
Next, configure our app to use the ValidationPipe as a global pipe. This will apply the validations to all our endpoints. In the main.ts file add the following line inside the bootstrap function.
bloggering/src/main.ts
7app.useGlobalPipes(new ValidationPipe());
Now we can use a ton of decorators to validate our properties. Check them here.
Add a @IsNotEmpty() decorator to our post content and title.
bloggering/src/posts/posts.entity.ts
...
@IsNotEmpty()
title: string;
@IsNotEmpty()
content: string;
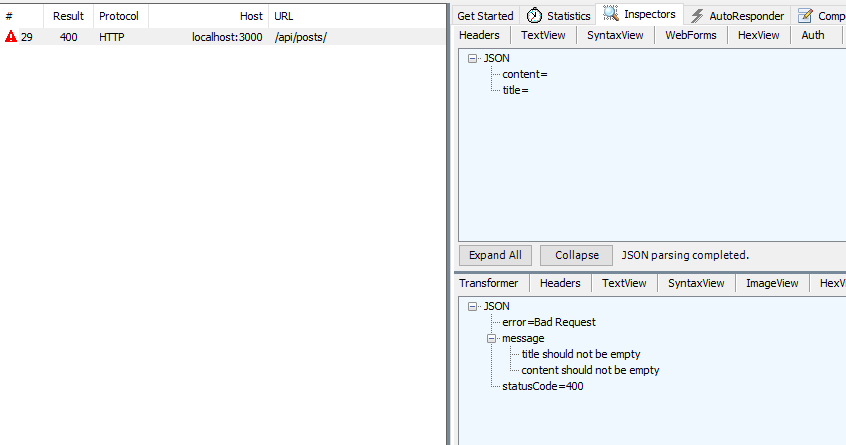
Try to create a post with an empty title and content now and see how we receive a HttpStatus of 400 (Bad Request error) with detailed information on the error.
Add Google Auth
So far, we are using a hardcoded author when creating a new post. In this section, let’s add a User entity to allow a person to authenticate and use our app. Also, we are going to add Guards to some of our endpoints. A Guard is a decorator class that has the responsibility to define if the decorated endpoint will handle the request or not, based on certain conditions.
To accomplish that, we will use a popular and recommended by NestJS library called passport. This library allows you to create “strategies” to do different types of authentication. I will bypass the local authentication using a username/password because there is a pretty straightforward tutorial in the NestJS documentation that you can check here. Instead, we will use OAuth2 to authenticate using a google account. I did not try, but probably you can use the same idea to implement other providers like Facebook, Microsoft, etc.
This is an overview of how our auth flow will look like.
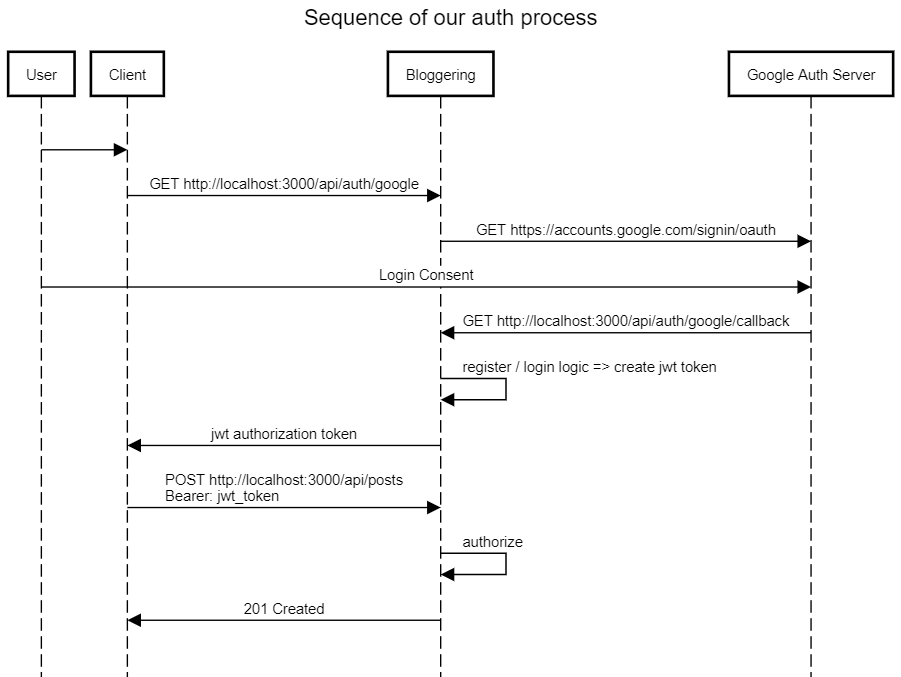 Usually, we would have a frontend as the client consuming our API, receiving the auth token, and saving it to append in each subsequent requests. But for our example, we will consume the API directly and append the authorization header manually.
- a client (in our case for test purposes, the browser, or some API test tool like insomnia or postman) calling the /api/auth/google route which will redirect to the Google login page.
- the user gives consent to login and google calls a callback endpoint in our application with the user data.
- our application will do some logic to log in or create the user if needed and create a JWT auth token that will be returned to the client.
- the client will call our protected APIs passing the JWT token in the authorization header in each subsequent request.
First, let’s install some dependencies.
PS C:\gems\blog-projects\bloggering> npm install @nestjs/passport --save
PS C:\gems\blog-projects\bloggering> npm install passport --save
PS C:\gems\blog-projects\bloggering> npm install passport-google-oauth20 --save
Then, create an auth module, an auth controller, and an auth service files.
PS D:\projects\bloggering> nest generate mo auth
PS D:\projects\bloggering> nest generate co auth
PS D:\projects\bloggering> nest generate service auth
After that, let’s configure our application API in google to get our credentials. Go to https://console.developers.google.com and register the bloggering application. Create a new project, select it, and enable the Google+ API by clicking on ‘enable APIs and services’ and searching for the Google+ API. Then go to ‘credentials’ and select the ‘OAuth client ID’ option when trying to create credentials.
Choose ‘Web application’ as the application type and continue. Add http://localhost:3000 under the Authorized Javascript origins and add http://localhost:3000/api/auth/google/callback under Authorized redirect URIs. Google will redirect the user information to our callback URI when a user successfully logs in. Save and replace the clientID and clientSecret because we will need for the google strategy passport.
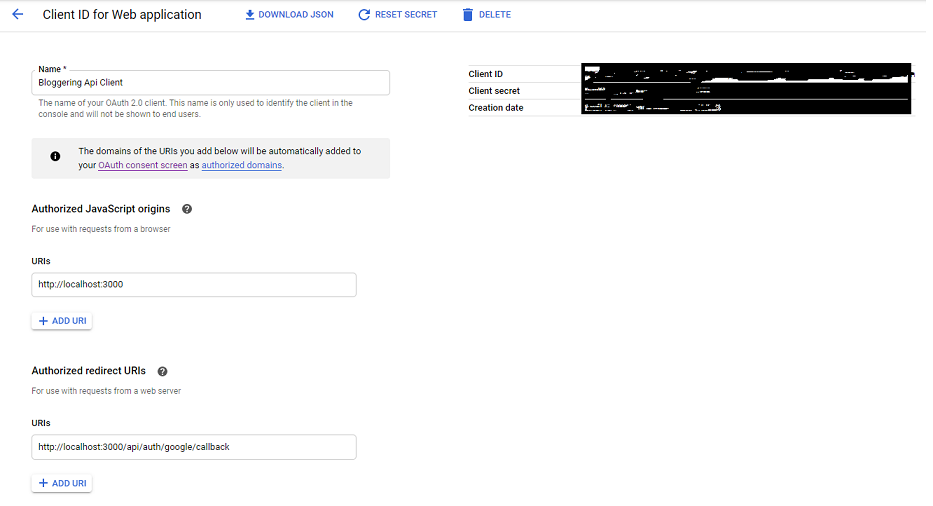
Ok, finally we’ve set all dependencies, configurations and we are ready to code! We are going to start creating a folder inside the /auth folder called strategies. Inside that folder create a google.passport.strategy.ts file. In the future we can implement other strategies here as well, like local strategy.
bloggering/src/auth/strategies/google.passport.strategy.ts
 1import { Injectable } from "@nestjs/common";
 2import { PassportStrategy } from "@nestjs/passport";
 3import { Strategy } from "passport-google-oauth20";
 4
 5@Injectable()
 6export class GooglePassportStrategy extends PassportStrategy(Strategy, "google") {
 7  constructor() {
 8    super({
 9      clientID: "ClIENT_ID", // <- Replace this with your client id
10      clientSecret: "CLIENT_SECRET", // <- Replace this with your client secret
11      callbackURL: "http://localhost:3000/api/auth/google/callback",
12      passReqToCallback: true,
13      scope: ["profile", "email"],
14    });
15  }
16
17  async validate(request: any, accessToken: string, refreshToken: string, profile, done: Function) {
18    try {
19      const jwt = "placeholderJWT";
20      const user = { jwt };
21      done(null, user);
22    } catch (err) {
23      done(err, false);
24    }
25  }
26}
This class extends PassportStrategy calling its constructor with our credentials from google. Copy them to the clientId and clientSecret parameters of super() to test. But be warned, never commit or push in your code this kind of data! Later we´ll remove and store them in environments variables. Also, we passed our callback URL, and the scope of the information we need to retrieve from google.
Our validate function will handle a successful login on google, when it calls our callback endpoint. Later we are applying some registration logic and create a JWT token, but by now just return a hardcoded string to serve us for test purposes. You can put a console.log or debug to see the content of the profile object that google sent to us.
REMEMBER to not commit these credentials to your source control
Import the GooglePassportStrategy as a provider in the AuthModule.
bloggering/src/auth/auth.module.ts
 1import { Module } from "@nestjs/common";
 2import { AuthController } from "./auth.controller";
 3import { AuthService } from "./auth.service";
 4import { GooglePassportStrategy } from "./strategies/google.passport.strategy";
 5
 6@Module({
 7  imports: [],
 8  controllers: [AuthController],
 9  providers: [AuthService, GooglePassportStrategy],
10})
11export class AuthModule {}
Now to be able to test what we have done we have to create endpoints to handle the requests from the client and from google! Remember the callback endpoint that google will call?
Let’s implement our AuthController
bloggering/src/auth/auth.controller.ts
 1import { Controller, Get, UseGuards, Res, Req } from "@nestjs/common";
 2import { AuthGuard } from "@nestjs/passport";
 3
 4@Controller("auth")
 5export class AuthController {
 6  @Get("google")
 7  @UseGuards(AuthGuard("google"))
 8  oauth2GoogleLogin() {
 9    // initiates the Google OAuth2 login flow
10  }
11
12  @Get("google/callback")
13  @UseGuards(AuthGuard("google"))
14  oauth2GoogleLoginCallback(@Req() req, @Res() res) {
15    const jwt: string = req.user.jwt;
16    if (jwt) res.status(200).json({ jwtToken: jwt });
17    else res.status(400).json({ errorMessage: "Authentication failed" });
18  }
19}
The first endpoint will be responsible to trigger our OAuth2 flow and start the communication with google. Pay attention that we use the AuthGuard passing the same name we used in the GooglePassportStrategy class. Under the hood, the passport will find our strategy and call google passing our credentials.
The second endpoint will be our callback that google will call when the user gives his consent to the login. Because of the AuthGuard, passport will find our google passport strategy and call the validate method. This validate method if you remember it, calls a done(null, user)callback. This function is responsible to populate our request with the user object.
Check whether your application works by going to your browser and typing http://localhost:3000/api/auth/google. If everything works correctly, you should be redirected to a google login web page, and after fill the information you should be redirected again to our application with the token in the response.
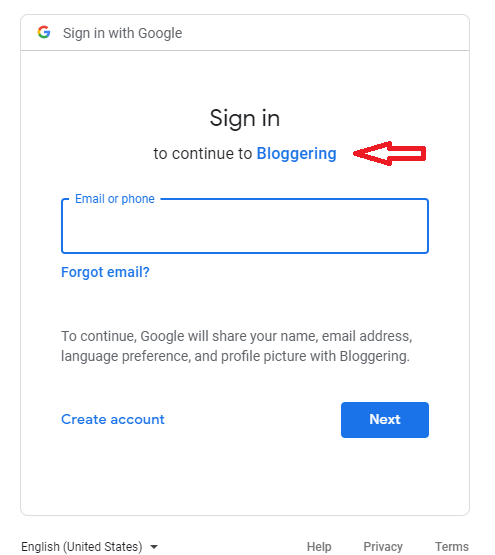
Next we are going to get rid of this hardcoded token and create a real JWT token. After installing NestJS JWT dependency we´ll implement the AuthService to create a user and generate our authorization token based on the info we received from google. For a while our user will be temporary, but as soon as we have a real persistence in the database we are going to register a real user in the correct table.
Create a User entity and implement an AuthService
bloggering/src/user/user.entity.ts
1export class User {
2  id: string;
3  thirdPartyId: string;
4  name: string;
5  email: string;
6  isActive: boolean;
7  createdAt!: Date;
8}
Next install our next JWT dependency
PS D:\projects\bloggering> npm i @nestjs/jwt --save
We will need to register the JwtModule in our AuthModule to be able to inject a configured JwtService in our AuthService. Again, DO NOT LET SENSITIVE INFORMATION LIKE YOUR JWT SECRET IN YOUR CODE. We well see how to remove it later.
bloggering/src/auth/auth.module.ts
 1import { Module } from "@nestjs/common";
 2import { AuthController } from "./auth.controller";
 3import { AuthService } from "./auth.service";
 4import { GooglePassportStrategy } from "./strategies/google.passport.strategy";
 5import { JwtModule } from "@nestjs/jwt";
 6
 7@Module({
 8  imports: [
 9    JwtModule.register({
10      secret: "hard!to-guess_secret",
11      signOptions: { expiresIn: "1200s" },
12    }),
13  ],
14  controllers: [AuthController],
15  providers: [AuthService, GooglePassportStrategy],
16})
17export class AuthModule {}
In our case this secret is used both to sign in and to verify the token. Because we will have only one API using this secret is easy to just store it in an environment variable, or other secret files.
bloggering/src/auth/auth.service.ts
 1import { Injectable, InternalServerErrorException } from "@nestjs/common";
 2import { User } from "src/users/user.entity";
 3import { JwtService } from "@nestjs/jwt";
 4
 5@Injectable()
 6export class AuthService {
 7  constructor(private jwtService: JwtService) {}
 8
 9  async validateOAuthLogin(email: string, name: string, thirdPartyId: string, provider: string): Promise<string> {
10    try {
11      const fakeuser = new User();
12      fakeuser.id = new Date().getTime().toString(); //fake id;
13      fakeuser.email = email;
14      fakeuser.isActive = true;
15      fakeuser.name = name;
16      fakeuser.thirdPartyId = thirdPartyId;
17
18      return this.jwtService.sign({
19        id: fakeuser.id,
20        entity: fakeuser,
21        provider,
22      });
23    } catch (err) {
24      throw new InternalServerErrorException("validateOAuthLogin", err.message);
25    }
26  }
27}
Currently, we do not have any logic yet. Instead our method just creates a fake user with the real data from google and create a signed jwt token that expires 1200 seconds with the data we want it to contains. This should be a generic service and you have to try to keep all concrete dependencies to a specific provider out of this class. Following this guideline should be easy to just implement passports for other providers and just call this same class.
Additionally change GooglePassportStrategy to inject the AuthService into the constructor and use it in the validate function.
bloggering/src/auth/strategies/google.passport.strategy.ts
 1@Injectable()
 2export  class  GooglePassportStrategy  extends  PassportStrategy(Strategy, 'google')
 3	constructor(private  readonly  authService: AuthService){
 4		...
 5	}
 6	async  validate(request: any, accessToken: string, refreshToken: string, profile, done: Function) {
 7		try {
 8			const  email = profile.emails
 9				.filter(x  =>  x.verified)
10				.map(x  =>  x.value)[0];
11			const  jwt = await  this.authService.validateOAuthLogin(email, profile.displayName, profile.id, 'google');
12			done(null, { jwt });
13		}
14		catch (err) {
15			done(err, false);
16		}
17	}
18}
We are almost finishing our authentication feature! We are still missing a @Guard to protect endpoints by requiring a valid JWT to be present on the request. Passport can help us here again with a passport-jwt strategy for securing RESTful endpoints with JSON Web Token. Install passport-jwt dependency.
PS C:\gems\blog-projects\bloggering> npm install passport-jwt --save
Create a new strategy called JwtStrategy inside our /auth/strategies folder
bloggering/src/auth/strategies/jwt.strategy.ts
 1import { ExtractJwt, Strategy } from "passport-jwt";
 2import { PassportStrategy } from "@nestjs/passport";
 3import { Injectable } from "@nestjs/common";
 4
 5@Injectable()
 6export class JwtStrategy extends PassportStrategy(Strategy) {
 7  constructor() {
 8    super({
 9      jwtFromRequest: ExtractJwt.fromAuthHeaderAsBearerToken(),
10      ignoreExpiration: false,
11      secretOrKey: "hard!to-guess_secret", //same as you put in the JwtModule.register on auth.module.ts.
12    });
13  }
14
15  async validate(payload: any) {
16    return { userId: payload.id, name: payload.entity.name, email: payload.entity.email };
17  }
18}
This class is responsible to extract the JWT token from the request authorization header, check if it is valid, verifies JWT’s signature, it is not expired. If we have some custom verifications like check claims, if the user is still active, etc we can add here. We could have a dependency on an UserService and load our user from the database.
In the return of the validate method we just map our token payload to a simple object.
This class will be used the same way as our google.passport.strategy, we will decorate
Do not forget to add our JwtStrategy as a provider in the AuthModule.
bloggering/src/auth/auth.module.ts
1...
2providers: [AuthService, GooglePassportStrategy, JwtStrategy],
3...
Last but not least, let’s update our posts.controller creation method to have an AuthGuard to check if the user is authenticated or not, and change the hardcoded author to be our user instead.
bloggering/src/posts/posts.controller.ts
 1...
 2import { Controller, Get, Param, Post, HttpCode, Body, UseGuards, Req } from  '@nestjs/common';
 3import { AuthGuard } from  '@nestjs/passport/dist';
 4...
 5@Post()
 6@UseGuards(AuthGuard('jwt'))
 7create(@Body() newPost: BlogPost, @Req() req) {
 8	const  user = req['user'];
 9	return  this.postsService.createPost(newPost.title, user.name, newPost.content)
10}
11...
To test whether our endpoint is protected or not, make a call without passing an authorization header and check if it returns 401 as a result. Now to test if everything is working, get the token you received from google and make a call to create a post passing it as an authorization header.
POST http://localhost:3000/api/posts/ HTTP/1.1
Content-Type: application/json
Authorization: Bearer <jwt_token_here>

{
    "title": "My First Post",
     "content": "Check Post"
}
We should receive an HTTP status 201 as a result. Make another call to get this single created post and check how our user is populated.
Wow! That was a lot of work! In part II we are going to add TypeORM to persist our data into a real database, extract our sensitive data to an environment file and expose it to our application using a ConfigService, add Docker, and DockerCompose to manage our services, and index our post content using elastic search.
Any suggestions/feedback contact me on @joaopozo or via email joaopozo@gmail.com ;)